|
|
By Chris Bolton - 2004
Introduction
Mending composite boats is not difficult. It may take practice, but anyone can learn to fix boats properly. If your boat gets damaged, it’s important to fix it as soon as possible. Damaged areas are much weaker, and will quickly pick up more damage and become more difficult and expensive to fix. Regular mending will reduce the number of mends and the extra weight on your boat, so will preserve its value, and will keep you drier and faster in the meantime.
The only way to learn is to get stuck in (not too literally!). You will soon find that you can fix quite serious damage in only an hour or so, and have your boat fully repaired within hours of damaging it.
Materials
All composite boats are made from a reinforcing fibre and a resin. The fibre is strong in tension, and the resin holds it in place and helps resist compression. The main materials used to make boats, and which can be used for repairs, are as follows:
Reinforcement
Resin
Kevlar comes in various weaves; the more tightly woven, the stronger it will be but the more difficulty it is to saturate with resin. Tightly woven kevlar will hold air bubbles underneath, when used on an uneven surface, so is good for building new boats, but more difficult to use for mending. Kevlar is also available as tape, which is in a weave which will bend round edges better, and won’t leave such rough edges. Kevlar is very difficult to tear; you can quite often find that a damaged area of kevlar has had the resin cracked off but the kevlar is still unbroken.
Kevlar carbon is easier to get the resin to soak into than pure kevlar, so it’s quite good for patches. It looks ugly on the outside of a kevlar boat, but is fine inside.
Pure carbon fabric makes a laminate which is very stiff, but will crack and break up if it gets damaged. An over stiff patch is not much use, unless it is very well attached, since if the boat flexes it can de-bond. The more a boat has been damaged, the more it will flex, and carbon is not likely to work well.
Diolen is a polyester fabric, similar to some sewing fabrics. People have been known to use duvet covers in the deck of boats, for the pattern. It’s difficult to tear, but not as difficult as kevlar. It’s slightly easier to saturate with resin than kevlar is, and is also cheaper.
Glass fabric comes in two forms; woven and chopped strand mat. The woven form can be is stronger but difficult to fold around corners. Chopped strand is a random mat of glass going all ways. It’s not very strong but is very easy to saturate with resin, and can be made to follow the shape of the boat. The strands are glued together with a glue which dissolves in resin, so that after it’s been wetted for a minute or so, you can move it into any shape you like. (Warning: epoxy doesn’t dissolve the glue.) Chopped strand is often used for the first layer of a mend, and it helps the next layer, which could be kevlar, to stick properly. Glass fibre repairs can be sanded down to a different shape afterwards, much more easily than kevlar can. Glass fibre is irritating to the skin. Avoid breathing dust from sanding it, and watch where the fibres go.
Peelply is a very thin cloth, usually a bright colour, which can be put on over kevlar patches to smooth the edges down, and stop the resin running down the boat in drips. Leave a corner with no resin, and pull off the peelply once the resin has set.
Glass and kevlar are also available as tape, usually 2.5 or 5cm wide. This is often thinner and more flexible than cloth, and is good for neat looking seams and cockpit rims.
Polyester is the cheapest sort of resin. It’s not really worth using for mends, compared to vinylester. Since you don’t need a lot of resin, it doesn’t cost a lot anyway. There’s no point putting a lot of effort into the repair and then have it fall off for want of an extra £ spent on resin. Use it if you can’t get vinylester, but not otherwise.
Vinylester, sometimes known by the trade name Derokane, is better than polyester and is recommended for mending all boats except epoxy. You use it exactly the same way as polyester.
Epoxy resin is stronger, more expensive, and more difficult to use. If your boat is made from epoxy, you must use epoxy to fix it; nothing else will stick. You can use epoxy to mend other boats, but it’s not really worth it. If you do use epoxy on a vinylester or polyester boat, that bit of the boat is then epoxy, so any later repairs will have to be epoxy as well. Epoxy can cause skin rashes; always use barrier cream and/or gloves, and use a mask when sanding it.
~0~
People may tell you that you need to put a layer of gelcoat on the outside
of your mends, to make them waterproof. For canoes and kayaks, this is not necessary;
all you need a layer of resin. (For yachts, see below) You don’t need
gelcoat unless you’re making something from a mould. Gelcoat is extra
thick resin which is modified so that it stays tacky on surfaces exposed to
air. The idea is that you use it for the first layer, against the mould, and
let it set before the next layer. It’s thick so that it doesn’t
run off the mould, and it stays tacky on the surface so that the next layer
will stick well. Gelcoat is the outside layer on a new boat, but that’s
just because it’s been made in a mould. If you do paint gelcoat over a
mend, it will stay tacky unless you cover it with clingfilm or something like
that.
(Yachts do use gelcoat for water resistance, but they have a special type of
gelcoat which resists osmosis. This is only a problem for boats which are permanently
afloat in salt water, and even then it takes 10 or 20 years to cause damage.
Some people say gelcoat is harder than ordinary resin and resists scratches
- I think this belief is a result of using cheap ordinary resin and better quality
gelcoat)
If you want to make your repair match the colour of your original gelcoat, resin suppliers can sell you colours to go in the resin. You can also use powder paint as sold for children to paint pictures. Test it out before putting it on your boat. By mixing the powders together, and testing with resin, almost any shade can be matched, but the powder grains can give a rough finish to the resin.
Masking tape can be useful for taping down patches that won’t stay flat, for example, round the bow of the boat. Peel it off as soon as the resin has set. It needs care to keep a smooth surface, but can be useful for the early stages of a big repair, where another layer will go over it.
The best place to buy your materials is a builder of composite boats. It doesn’t have to be a builder of sea boats, or even canoes and kayaks; racing yachts use good quality materials. DIY shops are fine for brushes, sandpaper, tools, etc, but don’t buy the resin which is sold for fixing cars, or other cheap DIY resin.
Keep resins in a cool, dark place. The catalyst for polyester and vinylester can explode if left in the sun. Don’t, however, let epoxy get below freezing.
Tools
To mix resins, use jam jars or other empties such as yoghurt pots. Resin dissolves some plastics!. Resin gives off heat as it sets, so the mixed resin in the pot will warm itself up, which then makes it set faster, and get hotter, and set faster...etc. A thin layer of resin in a big jar will be able to cool off, so the effect is not so bad. If you aren’t careful, you can actually end up with a solid lump of resin, too hot to touch and starting to smoke! Only mix small quantities of epoxy, or you will have trouble with this.
For putting catalyst into polyester or vinylester resin, some form of measuring tool is useful. A plastic pipette as used by school science labs works well. For mixing epoxy, measuring is essential. Syringes are OK; the tops of lemonade bottles can also be used as measuring cups (you don't need much for mends). Use one for measuring hardener and one for resin.
Scissors are required to cut the glass or kevlar. For kevlar, good, sharp scissors or the spring loaded type from DIY shops are essential.
Brushes can be fairly cheap. The very cheapest tend to loose their bristles (the resin dissolves the glue)
Brushes can be cleaned very effectively using washing machine detergent. This is much safer for you and your skin than solvents like acetone, and can keep a brush in good condition for many repairs. Work the powder or liquid into the brush and rinse out. If the brush is still sticky, work in more detergent and leave to soak for while, then rinse.
Coarse abrasive paper (80 or 100 grade) is essential for preparing the surface before you put the repair on. Use aluminium oxide paper (grey) or silicon carbide (black), not glasspaper or actual sandpaper, which are not effective on resin. Finer grades can be useful for smoothing the repair, but make sure you only sand resin and glass. Kevlar and diolen will go fluffy if you sand them, there must always be a layer of resin on top.
Portable heat. A gas powered hot air gun is useful for drying boats out in when away from home. Coleman make one, which can be bought from B&Q.
For big repairs, a power sander can be useful for preparing the surface, but chisels and sandpaper will do the job well. Always use mask and goggles when using a power sander.
For trimming of resin and kevlar, sharp wood chisels are very useful. To keep them sharp, you will need an oilstone. See later for how to use this.
The best way to support the boat while you work on it is to hang two loops of rope from the roof, at about the quarter points of the boat. If this is not possible, try to support the boat at a convenient height; careful work is difficult if you are cramped up.
For internal repairs, a long stick is required to reach the ends of the boat. Tape the brush onto the end of the stick. Old tent poles are good, as you can fit on the next pole section to make it longer. To get the patch material to the site, balance it on the brush, and carefully tip it onto the damaged area. Then push it about with the brush to get it exactly right. You may not believe it’s possible to do a good repair while working with a brush on the end of a 1.5m stick, but it is. Look at the inside seam on your boat and consider that it was put on this way. It was only practice that enabled the builder to do it.
Good light is important. For working inside a boat, a mains powered inspection lamp is useful. You can often keep the light outside the boat, and shine it through the hull. Lights get hot; in cold weather, you can help a mend set by placing the light near it for a while.
A warm, dry working area is very useful. If the people who control your house will allow it, mending can be done in the house, but protect everything well, and make sure no glass fibre is left about.
All resins set faster if its warmer. For polyester and vinylester, you can speed up and slow down setting by using more or less catalyst, and resin which is slow to set will respond to being warmed. Don’t ever be tempted to vary the mix on epoxy, as if you use the wrong proportions, either way, it never sets. Epoxy is also more fussy about temperature. If you put it on in the cold, even bringing it into the warm won’t set it. Epoxy must be used and allowed to set at room temperature or warmer. Warming it before application will reduce the setting time, as will leaving it to stand and self heat itself for 15min before using it. These tactics are to be used with caution, as it might set too fast. Don’t get epoxy too hot or it will give off nasty fumes. Experiment with small quantities.
Protection
Always use a barrier cream on your hands, even if you wear gloves as well. Often in the middle of a job you need to do something which the gloves are too clumsy for, and so you take them off. Resin (particularly epoxy) can do permanent damage to your skin through repeated contact. There’s a phenomenon called sensitisation; the resin it may be no problem to start with, but if you abuse it, once it starts to irritate you, it will continue to. Several people cannot now use epoxy boats because of this.
Particularly when learning, your clothing is likely to get resin on it. Wear something which you won’t be upset about if this happens.
Dust masks (as sold in DIY shops) are recommended when sanding, particularly if using a power sander or with epoxy.
Work in a well ventilated area. Resin fumes can be dangerous, particularly from epoxy.
Damage
Damage to composite boats occurs from two main sources; direct impacts, and indirect, usually by compression or bending of the boat. It’s worth understanding what causes the damage, as it lets you work out how strong the repair needs to be. For example, damage on landing is almost certainly going to happen again, and needs a strong repair. A lengthways crack in the deck, 20cm behind the bow, is not seriously weakening the boat, and the repair need only keep the water out.
Direct impacts are obvious - the damage occurs on the part of the boat that
hit the rock.
It takes the form of totally crumpled, frayed kevlar, or a crack caused by the
shell of the boat being bent sharply, or a cut where a sharp rock has sliced
through the kevlar strands.
Indirect damage occurs somewhere else in the boat. The actual impact site can
be almost unmarked. This is the reason for cracks in odd places, like the middle
of the back deck.
Indirect damage is more subtle, and quite often doesn’t look serious -
but it will spread if you don’t catch it in time. Its more common in white
water competition boats than sea boats; when your stern bangs on a ledge, the
whole boat tries to bend up at the ends. This compresses the deck, and weak
spots will buckle and crack. Try bending a paper tube if you want to see how
this happens.
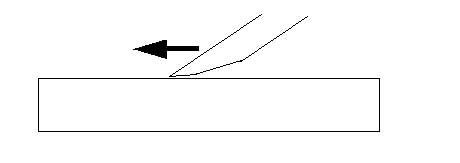
Typical weak spots when the boat bends are the seams, and where there is a step in the deck, such as round the cockpit. As the boat bends, it tries to flatten itself at the bend (again, try bending a paper tube to see this effect). Any cracks in the deck or seam, particularly if it looks as if one side is trying to overlap the other, should be patched with kevlar as soon as possible. Cracks in the deck can be done neatly on the inside, with just resin to seal the outside. Cracks on the seam must be fixed inside and out. It’s very tempting just to fix the outside, because the inside is so hard to reach, but if you don’t fix inside, you’re wasting your time on the outside, because it will break again.
A variation on bending damage occurs in front end collisions with rocks. The impact is usually nearer the bottom of the bow than the top, and this compresses the bottom part of the hull. The compression causes a crack about 50cm back from the bow. This crack often has the sides overlapping, as the boat tries to telescope into itself. Getting at this on the inside is difficult, so it usually has to be patched on the outside, or a window has to be cut in the deck.
Find where the leak is
Dry the boat and look at it carefully, inside and out. Look for cracks in the resin, or for previous patches which are lifting at the edges. Cracks between the cockpit rim and the boat are a common cause.
If you can’t find the leak by looking, place the boat on a flat dry surface and fill it with water until you can see a damp patch on the ground. You should then be able to see where the drips are flowing from.
Make a repair
1. Decide what your repair is going to be made from. Always patch the inside
if you can, because it looks neater, keeps the boat smoother and most important,
prevents the repair being scraped off against rocks. For a small split, a single
layer of kevlar (or kevlar/carbon) is usually enough, but major damage will
need more layers.
2. Usually kevlar or kevlar carbon is the best thing to use, but use chopped
strand glass for the first layer if the surface is uneven. You can also use
glass or diolen as an intermediate layer, for boats where a bit more weight
doesn’t matter. The mend will look better if the last layer is the same
as the boat is made from. To simplify the writing, the rest of these instructions
are written for kevlar, but apply to any type of material.
3. Make sure the boat is dry. Use a heat gun, carefully, if necessary. Set yourself
up in, as far as possible, a warm, dry, well lit place. Lay out everything you
need. Put on your protective clothes, barrier cream, etc. If working in a house,
protect the carpets!
4. Thoroughly sand the area to be mended. If you don’t, the mend will
fall off sooner or later. Unless it means making a hole all the way through,
remove all the damaged layers, using a chisel if necessary. Don’t worry
if the kevlar strands go fluffy at this stage; it will help the repair to stick.
5. Cut out the kevlar to the right shape, and lay it out somewhere safe. To
get kevlar to fit on sharply curved parts of the boat, it’s better to
cut it on the diagonal. If the surface is uneven, cut small patches to fill
in the hollows. Alternate layers of glass and kevlar work well here.
6. Mix the resin. Pour into the mixing jar and then wipe the neck of the storage
jar, or the lid will stick. See above on ways to measure catalyst and epoxy.
Stir thoroughly. Only mix a small amount, as you can always mix more. If you
mix too much at once, you’ll end up rushing to use it before it sets.
It’s very important to be able to take your time and work carefully. Remember
that resin, especially epoxy, heats up as it sets. If you mix too much, the
heat can’t escape, so it gets very hot, and then it sets even faster.
7. Brush resin over the surface to be mended. Push resin well in to any cracks
in the surface. See above for ways to work inside the ends of the boat, where
you can’t reach.
8. Lay the first layer of kevlar, etc, over the resin and push it down with
the brush. Use a stippling action, and work the resin up through the fabric.
This avoids trapping air under a layer of kevlar. If you can’t get the
resin through, you may not have put enough resin on. Depending on the size of
the patch and how well the rest of it is going, either take it off and put resin
underneath, or put more resin on top but beware of air bubbles. An alternative
is to lay the kevlar on a board and “wet it out”, that is, brush
resin into it from both sides until it’s thoroughly soaked, then lay in
on the boat.
9. If more layers are needed, paint on more resin then repeat the previous step.
Do all the layers in the mend in one session. If you let the resin set, the
next layer won’t stick as well, and there will be more resin in the mend,
making it heavier.
10. The ideal is to get just enough resin to fully saturate the fabric. Too
little resin will result in no strength, but too much resin will not make it
stronger, just heavier.
11. If the kevlar won’t lie down, keep stippling it with the brush. If
it still won’t behave, a layer of peelply may keep it down. Failing that,
try strips of masking tape, stuck down on one side of the mend, stretched over
it and stuck down on the other side.
12. After the last layer, peel ply will produce a better finish. Cut a piece
which is bigger than the patch, and overlap it onto the boat all round. Apply
it like any other layer, but don’t stick down all the corners, so that
you can peel it off when the resin has set.
13. For a rapid repair, apply heat using a hot air gun. Take care! Too much
heat will boil the resin, then it will set with bubbles in. If any moisture
remains deep in the original laminate will turn to vapour and cause bubbles,
so only use a heat gun if you’re sure the whole area is bone dry. Too
much heat will melt the unstuck edges of peelply.
14. Let the resin has set, usually overnight. Rip off the peelply, if used.
Trim away any other sticking out bits of kevlar, ideally with a sharp wood chisel.
Sand off all spikes of glassfibre, as these can give nasty splinters in your
fingers.
15. You may want to paint a little resin over the mend, after sanding it off.
This will seal in the end of the fibres and avoid water soaking into any areas
which are not quite fully saturated with resin.
16. If you can, keep the boat in a warm place for a few days before getting
it wet. Resin continues to cure for a while after it has set.
Other tips
1. Where the resin has been scraped or cracked off, to leave exposed kevlar,
the best thing to do is to recoat it with resin. Make sure you do this in warm
conditions, when the resin will be more liquid, and will soak in better. When
it’s set, there will be some small spikes of kevlar sticking up, coated
in resin. Trim these off with a sharp chisel, then apply another coat of resin
to seal it.
2. If a kevlar boat is bent out of shape, perhaps because of being folded, it
can be heated with a hot air gun and bent back while still hot. If you hold
it in place while it cools, it should stay in the shape you’re holding
it. Use a damp cloth to avoid burns! This takes a bit of practice and is best
tried on small areas first.
3. Its quite possible to fix a boat overnight and race it next day, if you have
to, but you may need to do a proper repair when you have time. Dry it out with
a heat gun, apply the patch, warm this with the heat gun, smooth it off when
set, apply more resin, more heat, etc.
Chisels
It may seem strange, but a sharp wood chisel is one of the most useful things to have when mending boats. It will assist in cleaning damaged areas, and will trim off spare spikes of kevlar. Always keep both hands behind the cutting edge. To sharpen, use an oilstone. This is a rectangular block of carborundum stone. Fix it in a vice, if possible, and put a few drops of oil (any sort will do) on the top surface. Then hold the chisel at the right angle, about 40o, and push forward about 15 - 20 times. Then check the edge, and repeat if necessary.
Other uses for resin and kevlar
These are not strictly mending, (unless you’ve smashed the previous fittings) but involve the same materials and techniques.
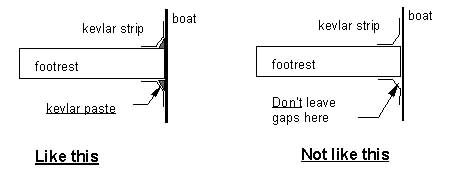
Footrests and knee bars (more applicable to white water boats).
To fix these in, the important thing is to provide a solid connection where they meet the boat. Cut the wood to shape, leaving the smallest gap possible between the wood and the boat. Then glue the wood in place using Araldite Rapid (from DIY shops. The Rapid type is in red and white tubes) This sets in 10 minutes and hardens in under an hour. This will hold the wood while you put in the proper fixing. The strength is needed at the point of contact. The best way to do this is to cut up some kevlar (or glass if you really want to) so fine that the weave is lost, and you end up with a lot of 3 to 5mm bits. This almost looks like kevlar cotton wool. Mix this into the resin, to make a dough, and form a fillet around the wood.
See sketch below. With care, you can get a fairly smooth surface. It may help
to use your fingers, rather than a brush, if you can’t get your head in
the boat to see properly. If so wear 2 pairs of thin pcv gloves. For foot rests,
put some strips of kevlar over the top, but make sure there is no gap underneath
or it will have no strength. For knee bars, the kevlar dough is good enough.
Sand it down at bit when its set, to avoid cutting your fingers when carrying
the boat.
To remove old footrests etc, saw through the centre and lever carefully sideways. It may help to heat the kevlar holding them in. Heat softens resin, particularly epoxy, but it can be difficult to only soften the right bits.
Chris Bolton - 2004.