Storage Solutions for Sea Kayaks.
Mike Buckley - 2005.
Storing a large, relatively fragile and expensive sea-kayak is sometimes a challenge - here are some potential solutions to the problem. In an ideal world, a boat is best stored indoors to protect it from UV degradation and keep it dry.
These days however, my boats have to live outdoors as the garage is too short for the sea-boats. I used to use nylon KayakSport cockpit covers to seal the cockpits as they were superb, but don't seem readily available as at 2012. Despite the rest of their kit being excellent, the neoprene Nookie cockpit covers I've tried deteriorated very quickly. Peak UK ones seem good value though and seem to be standing up well.
Racking.
A simple, straightforward way of storing kayaks is to use a suitable rack - the one below was made for me by a local blacksmith using 2in x 2in for the uprights and 2in x 1in box section steel for the "horizontal" boat support racking. (The supports are just off horizontal by about 5 degrees - this ensures the boats sit on their side slightly which makes rain water drain off nicely).
Round bar was used to create "U" loops to attach bungee to the uprights and the boat supports to retain the boats and also to provide strong points for a security cable.
High density upholstery foam protects the hulls - half-round wooden beading is used between the metal of the bars and the foam to provide additional protection.
Uprights are 6ft, boat supports are 2ft. As shown, the rack is secured by Rawlbolts to a wall, and subsequently using a base plate made to allow the rack to free stand. Any blacksmith or metal worker should be able to make this - or talk to Kari-Tek who offer similar custom racks made to measure.
The metal was first painted with Galvafroid (a high zinc content paint) and then with smooth Hammerite. Having them hot-dip galvanised would be a better, albeit more expensive, solution. However, after nearly 15 years the metal is still largely rust free and the rack has been re-Hammerited twice, but largely for cosmetic purposes.
 |
 |
Racked storage for three boats. |
|
 |
 |
|
Detail of the padding and security/bungee loops. |
|
 |
|
|
Latest configuration, with the uprights mounted on a free-standing base plate and a two-part Aleut secured using a pair of wooden saddles to stack the bow section on the stern. Bungee and cam straps secure it. The singles are now stored upside down as I've found the sun has faded the red deck on the Xcape rather badly, rather quickly. The somewhat older Capella is unaffected though. |
|
 |
 |
|
Front and rear saddles - made using some scrap timber, screws and padding. The green line is just a handling aid to make carrying the section easier. |
|
Suspension
If you are lucky enough to have a garage both long and high enough to allow you to suspend a boat from the ceiling or roof, you can create a nifty block-and-tackle arrangement to hoist the boat up.
At it's simplest, get some pulleys like the ones available in decent hardware stores, and create the same sort of idea as this old fashioned clothes airer.

(Pic: Castinstyle.co.uk)
~~~
For something a little more sophisticated, and with the benefit of a 2:1 mechanical advantage from using a block-and-tackle arrangement, get some blocks, some slings or loops, some screw-in hooks, a cleat and rope and make yourself a boat-hoist as outlined below.
If you position the set-up correctly, you could drive your car into the garage with the boat on the roofrack, attach the slings to the boat and just hoist it off the rack. When you want to use it again, drive into the garage and lower the boat onto the rack.
"Shopping list" •You need 2 "single blocks, with eyes", 1 "single block with eye and becket", 1 "double block with eye and becket" and 1 "double block with eye". If your chosen blocks have "swivels" on the eyes or hooks, that's nice but not essential. (The "eye" refers to the loop from which the block is hung, or to which the load is attached. The "becket" is a small loop below the block to which the sheet (or rope) is attached). •Visit your local hardware store and get 3 BIG screw-in hooks - these are to attach the blocks to the ceiling or rafters. Also get a cleat and some rawlbolts (to attach it to a brick or concrete wall) or nice strong screws (to attach it to a wooden wall). IF you are going to attach to a plasterboard ceiling and/or wall, consider carefully the overall weight and whether plasterboard alone has adequate strength! You really need to be able to screw the hooks and cleat into something solid. •You'll need some line (5 mm laid polyprop as shown will do - it does tend to twist annoyingly though, so 4 or 5 mm braided line or similar is a better, albeit more expensive alternative). •A couple of climbing slings (or rope to make loops) to support the boat.
Instructions. •Attach your sling/loop to each of the "single blocks". Slip the boat into the slings/loops. •Screw your hooks into the rafters at a suitable distance apart to support the boat. Place the final one close to the end wall, about 7cms out from it. •Attach the cleat to the end wall, at about waist height. •Hang your remaining blocks as follows: 1/ the "double block" on the hook by the end wall with
the cleat. •Now take your line and feed an appropriate length thro all three ceiling blocks, starting with the one nearest the wall to which you've attached the cleat. Feed it down to the furthest away single block with the sling/loop and back up to the becket on the ceiling block. Attach with a suitable hitch or splice - a 'round turn and 2 half-hitches', a 'half blood-knot', or an 'eye spice' will all do the job. (See the Almanac / Camping section for links to knotting sites). •Take a second line and feed an appropriate length thro the remaining two blocks, starting with the one nearest the wall to which you've attached the cleat. Feed it down to the single block with the second sling/loop and back up to the becket on the middle ceiling block. Attach with a suitable hitch or splice. •Take up the slack, knot the two lines at the end just to keep them together. (Overhand Knot or Figure of Eight). If you like, make another knot at a point where the boat can hang at a convenient height to allow you to work on it, or lift it out of the slings. •Hoist the boat. You've got a 2/1 reduction in effort with this system. Secure the line using the cleat. To lower, undo the line - if you let it run under the bottom tang of the cleat you'll get a little friction to control the descent. If you've added a second knot, just hook the cleat into it and the boat is neatly suspended.
The pictures below outline the set-up. |
 |
 |
||||
| Laid out on the floor, these pics represent the general layout. The topmost blocks are attached to the rafters or ceiling using the hooks or any other suitable method. The cleat is attached to the wall to secure the ropes once the load has been raised. (When the two blocks are as far apart as they can go, they are "overhauled". When as close together as possible, they are "choc-a-block" - just two everyday terms with a Nautical origin). |
|||||
| Left hand pic above shows the double block which is attached to the ceiling (although this one is shown with a becket, it doesn't need one). All it does is carry the 2 ropes past the end of the boat and brings them down the wall to the cleat used to secure them once raised.
|
Right hand pic above shows a pair of blocks, 1 double, 1 single. These are attached to the ceiling. (Both have beckets, the "loops" at the bottom, to which the rope has been spliced). Only 1 screw-in hook is shown as I only had one available when I took the picture! 2 are needed, 1 for each block. The single blocks at the bottom of the pic carry the boat support slings.
|
||||
 |
|||||
Overall view of the ceiling blocks and the boat carrying blocks (2 x single blocks) with the boat support slings. In this example I used 2 old climbing slings.
|
|||||
 |
|||||
| Close-ups of the blocks used. The ones on the left of the tape measure have a fixed "eye" at the top and a "becket" at the bottom. The one to the right is one of the pair carrying the boat support slings - this one has a swivel eye, but that's not essential. It doesn't have a becket as there's no need for it in this application. These are high quality (and therefore expensive) rigging blocks from a chandler - realistically they could be replaced with cheaper general purpose blocks obainable from most decent ironmongers or hard-ware stores. They could also be replaced by a single and double pair of "clothes airer" pulleys (as below) and a pair of screw-in eyes to replace the beckets to attach the rope back up at the ceiling from the blocks at the boat end.
|
|||||
|
|||||


~~~
IF that's all too much, get your credit card out and point your browser here and here for a couple of seriously fancy alternatives from the States. (Where else?) My solution illustrated above is somewhat more economic.
~~~
Here's another solution - as used by Douglas Wilcox. Simple, effective and inexpensive.

(Pic: Douglas Wilcox)
He says - "I was lucky to have rafters. I bought two heavy duty open canoe straps. Tied the buckle to one rafter, threw the loose end over the other rafter then down round the boat and back up through the buckle.
I leave two big loops suspended then the boat is carried into the garage and pushed through the loops. I then pull alternately on each strap about 9" at a time and the boat rises gracefully upwards.
The big wide straps spread the load and I have positioned them over the hull where the internal bulkheads give it support.
Cheap, easy and I can do it myself."
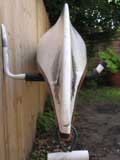
Wall brackets
Another way to store a boat would be to make a wall bracket to allow it to be stored on it's side, attached to a wall. I had some of these made a few years ago for storing plastic gp boats, but the same principle would apply for a sea-boat. The hull profile is first made in cardboard and then transferred to the metal. Remember to allow a bit extra (5 - 7 cms) to allow for the hull protection and to give some space between the hull and the brackets.
A plasma cutter made short work of cutting the shape. The right-angle brackets are "L" section welded to the profiled supports. Rawlbolts secured them to the wall at an appropriate height.

These were made from 4mm steel and measure about 40 x 15 cms. It helps to have friends with oxy-ac, plasma cutters or mig welders! Alternatively, something similar could be made in wood. The hull protection is plastic pipe cut down the middle.
~~~
"Grazie" uses some commercially available general purpose brackets (he thinks they came from B&Q) to store his boat - attached to a fence, they keep the boat off the ground nicely.
 |
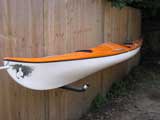 |
| General purpose brackets.
(Pics: "Grazie") |
|
~~~
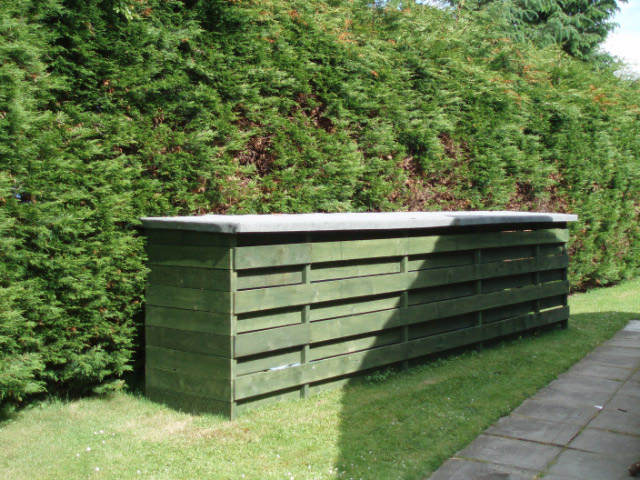
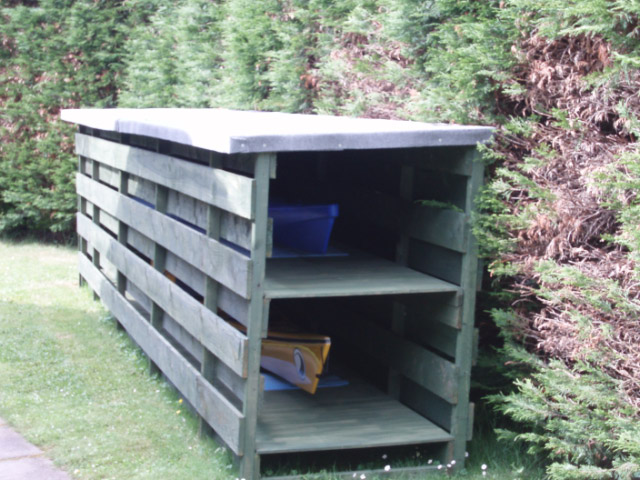
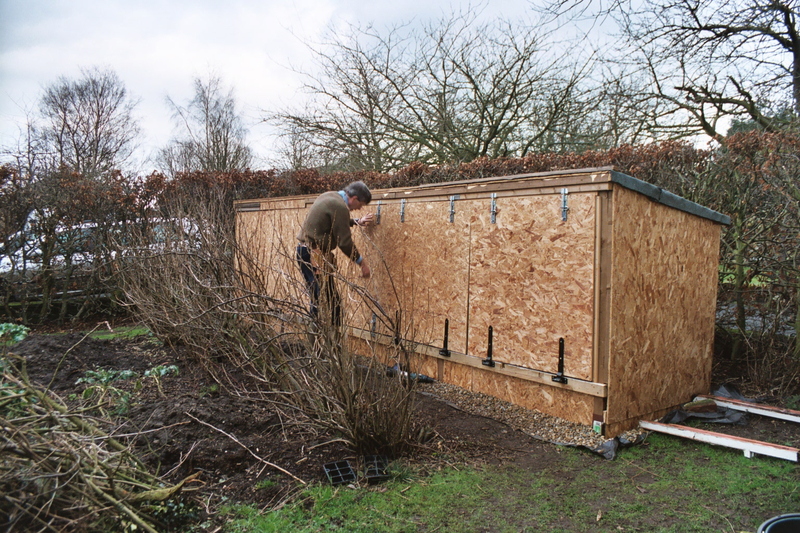
Sheds / outdoor storage solutions
MattB has a rather splendid shed to store his boats! (See this discussion)
~~~
Ian Johnston from Aberdeenshire sent me details of the shed he constructed - the design brief was: