Outfitting Sea Kayaks - deck outfitting
Go to |
|||
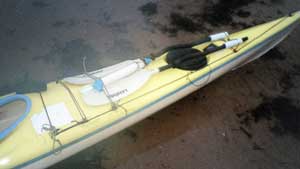
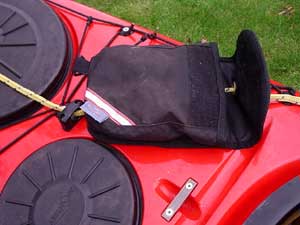
Deck bags - these come in a variety of forms and designs - there are large ones and small ones and some are totally waterproof. Personally, I like this contoured, semi-waterproof bag made by ""North Water as it's big enough for the things I need to have handy like a flare, camera, sunscreen, energy bars and the like, yet doesn't catch the paddle on full rotation or impede a roll.
It's semi-waterproof and the mesh side pockets hold things like a Silva compass or wee odds and ends. I found that the bigger / wider bags available all seemed to get in the way too much and if nothing else, encourage you to carry weight high on the boat.
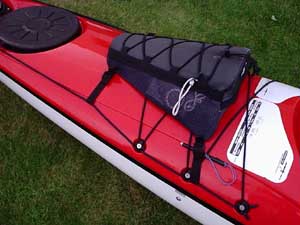
"North Water" peaked deck bag.
~ ~ ~
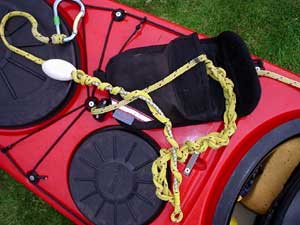
Nick Benny has a novel approach - he uses a traditional 'Granny' style string bag, simply tied around the decklines forward of the front hatch, a great multi function piece of kit, great for carrying all those loose items to or from your boat and for storing the fish! It also acts as a "wave break"
~ ~ ~
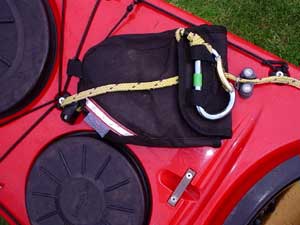
Many folk use a traditional "bum bag" for odds and ends on deck. The waist belt can be secured round the deck lines.
~~~
Is this the ultimate in kayak modification? A cubby-box accessible from the cockpit, holding all those emergency essentials. Seriously excellent.
 |
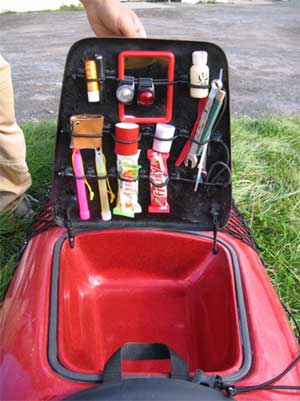 |
As an alternative to the traditional
deck-bag, Mark Tozer provided these pics of an astonishing way of storing
kit! The pics speak for themselves! Seen at ASSC apparently. It's a
design used by Lettman
Kayaks in Germany.
He says the boat belongs to Freya Hoffmiester who is a keen paddler and also a succesful ice cream parlour entrepeneur in Germany. Freya can often be seen travelling across Europe and the UK in her giant mobile home seeking out great kayaking locations. (Pics: Mark Tozer) |
|
Deck lines commonly come in black - this can cause problems! "Sub5rider" says "One thing I've discovered after I bought several meters of black bungee cord for this, that and the other is that it was a big mistake. I have black decklines & black bungee, and I can never sort out what's the paddle leash/map case/pelicase/aqauapak/etc when I need to. I've now acquired some white and some yellow bungee and will colour co-ordinate things".
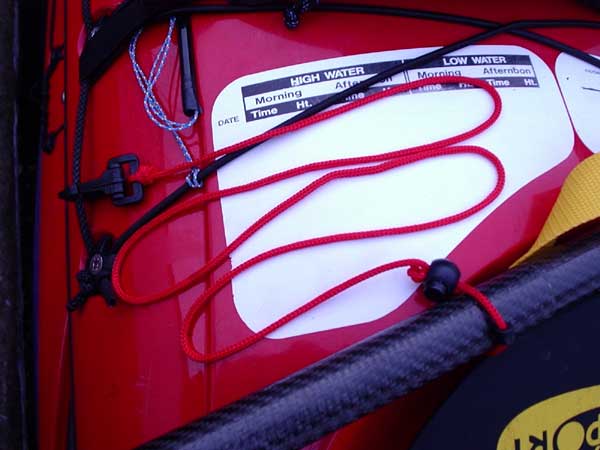
Deck slates - "Sharky" has tried various deck slates - he's tried various methods over the years from writing directly on the deck with a chinograph pen to tying a piece of plastic to a deck line with a small lanyard (shaped vitalite lids work well) . The ones shown here were produced by Knoydart and are no longer available - however, see this discussion for details and how and where to buy an alternative.
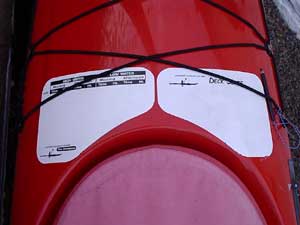
Knoydart deck slate & pencil.
Paddle Park / Paddle Leash - You can buy them ready made (at between £8 and £20) or, make your own.
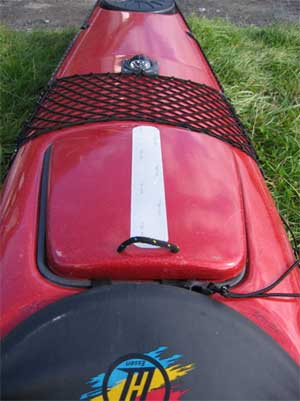
Rear deck storage - Nick Benny says the best addition to his sea kayak is the custom shaped net he made for the back deck area immediately aft of the day hatch and towing cleat area. Manufactured from small good quality polypropylene rope about 2 or 3mm in dia with a bungee outer frame that uses plastic clips to secure it to the decklines. Perfect for storing BA, towline bag etc and reachable without a problem from the cockpit.
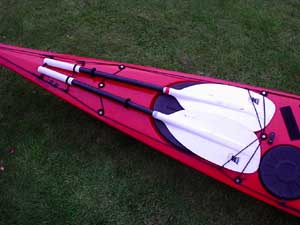
Spare paddles / splits - we usually carry them - somewhere - commonly on the rear deck - but there the ends can scratch the gel-coat. Plastic pipe helps stop this and secures the ends nicely. Some additional bungee has been added to the for'ard set to make the paddles more secure and a bit more resistant to being pushed sideways in surf and coming off the deck.
 |
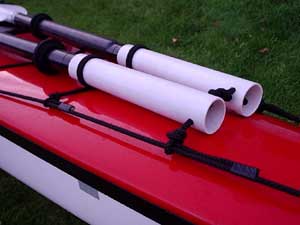 |
Two short pieces of white domestic plastic
waste pipe secure the ends of the Lendal splits on this Quest - the
extreme ends have been drilled for some deck line which stops them sliding
rearwards out of the for'ard bungees. Bungee is clove-hitched round
the other ends to give enough flex to allow the paddles to be slid apart
enough to open the hatch without having to take them off the deck. |
|
~ ~ ~
 |
Chris Bolton uses a similar solution and comments
that restowing the splits (on your own, at sea) is far easier with tubes
as it's impossible to get them under the rear bungees otherwise.
Any waves will knock them backwards, ie, into the tubes. It is possible
to reach behind when capsized, retrieve a paddle which is already in
the right attitude, and roll. No fixings need to be released to do this.
(Pic: Chris Bolton) |
~ ~ ~
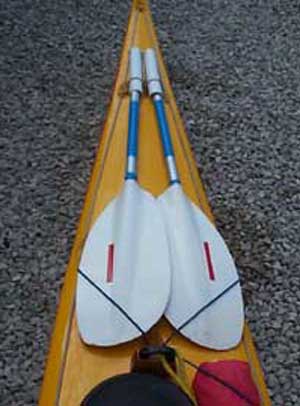
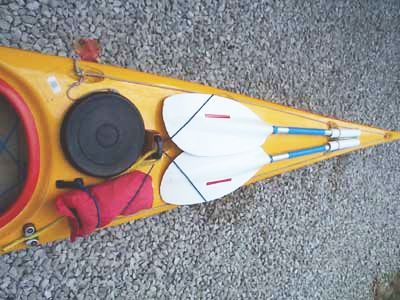
A lot of people like to carry their splits on the front deck. Seen on the SCA Loch Etive trip.
Splits & a pump on the foredeck.
~ ~ ~
"Sharky" comments that he tends to carry his on the front of his Romany. This has a two fold function - a) it displaces waves coming over the bow and b) keeps the back deck clean so that if he tows, the line doesn't snag on anything.
To prevent gel coat scratching he's glued a piece of closed cell foam under the front bungees. This also enables a snug fit thus preventing paddle slippage.
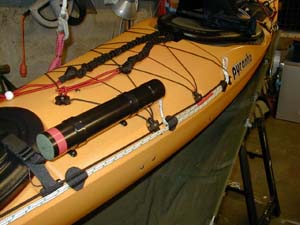
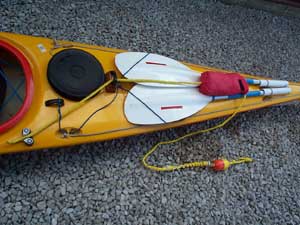
Storing a sea anchor on deck - Mike Wood writes with a detailed description of how to do it in such a manner that it can be deployed easily. "I wanted a failsafe way of storing and deploying a sea anchor/drogue, since I've got some experience of using them in HM's survival dinghies, and they really stop you drifting about.
The drogue is pretty big - possibly too big, if that's a problem(?) - and just stuffing it in a deck bag didn't seem the best solution if I was going to need it in a hurry, possibly after a wet exit. Add to that the chance of the line getting tangled around stuff on the deck (there's a lot of tape and line to get snagged if the drogue catches the wind)and possibly tearing it off, and I felt I needed to improve on the "tie it to the toggle and chuck it in" method.
Obviously, it needs to be deployable from the cockpit as well as from the water. The line needs to be stowed so that it deploys cleanly, and the drogue needs to be stowed so that it is easy to find, deploy and recover.
The system:
The drogue is stowed inside a 30cm length of 52mm black drainpipe. This has
one end blocked with a circle of old kipmat (just sharpen the end of the drainpipe
a bit and press/turn on the mat - perfect fit) which is epoxied in place.
The drogue is a tight fit inside. The line - 8mm floating line in yellow (I
too get confused with all-black lines) - is tied to the drogue and exits the
pipe through another kipmat disc with a hole in it, sealed with mastic. If
the discs are cut as above, the drogue stays dry.
The pipe is mounted using the clips normally used to fix the
pipe to a wall. The "wall brackets" are very small, and can be glued
to the forward deck about 20cm apart. The pipe is fed through and the clips
cinched up using SS hardware. This allows the whole lot to be removed if necessary.
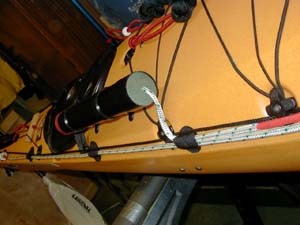
The line is led down to the deckline and back to a point reachable from the
cockpit, where it's tucked under the bungee. From there it goes back to the
bow and is connected by a SS carbine hook to the lifting grab (Pyranha Orca
- Ok Ok).
The line is prevented from going anywhere by 5 Velcro "coins" - the heavy duty type - fixed to the hull alongside the deck line. The "spiky" part on the hull, and the "fluffy" part over the line, trapping it and keeping it taut. This keeps the line out of the way on the extreme edge of the deck and, unless you deliberately deploy it on the opposite side to the line, the drogue can't snag anything as it runs.
Drawbacks? Need to be aware that if doing an X-rescue, you stand a good chance of wiping the whole thing off the deck. Some folks prefer a clear deck for easier wave run-off - not much splash from this system, but anything on the front is going to cause some, I guess."
 |
 |
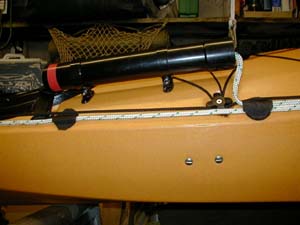 |
To use: Pull the loop of line at the cockpit end. The drogue pops out and falls into the water alongside the boat. Water pressure then pulls it forward and strips the line out from under the Velcro so no chance of snagging. To recover, just paddle forward, trip the drogue and stow anywhere convenient until able to repack in the pipe. (Pics: Mike Wood) |
||
Security is an issue, especially when boats have to be stored outdoors or left unattended on a roof rack. Some boats (like the Quest) have a strong point built in at manufacture. An alternative would be to use the seat to run a security cable round but this is a pain if you use a cockpit cover. Another option would be to use the tow-line bulls eye, or fit a stainless "U" bolt like this one. It's a deck fitting for the ends of stays on yachts.
It serves as the bulls eye on this glass Capella - fitted with stainless hex-headed bolts and a couple of very tight nuts on each of the threaded ends, it's (relatively) secure and will deter the opportunist thief as it would be a bit harder to cut though than the commonly used plastic bulls eye type.
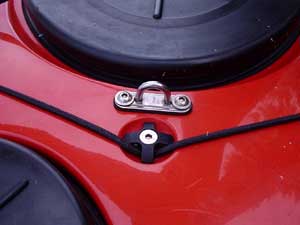
Stainless steel "U" bolt fitting to act both as a bulls eye / fairlead and a security point.
Fitting cleats, fairleads and other thro-deck fittings is easy enough on both glass and plastic boats. Drilling the hole(s) is best done with a very sharp drill bit, ideally one for metal. Use one fractionally larger than the bolts used. To prevent the gel coat on a glass boat from cracking it's a good idea to first run the drill in reverse which will cause the gel to turn to powder - then drill as normal to create the hole.
Some form of re-inforcement under the fitting is essential if the fittings are to be subjected to load. Large washers, marine ply, stainless steel and a bit of plastic chopping board have all been used to spread the load. Use marine grade stainless steel where possible.
The U bolt shown above comes with a rubber gasket so leakage is not an issue - if you do need to seal the fitting then a thin smear of silicone sealant will work, or use Sikaflex 291 or 292. Heavy duty, waterproof "No More Nails" will also do the job. Some people suggest glassing over the fitting on the inside to protect dry bags etc, but I've always managed to find bolts of the correct length.
As with all such jobs, get the placement correct first, then drill the holes! Be especially careful to check there is enough room for whatever re-inforcement you are using, especially where the fitting is close to a deck fitting, a bulkhead or a hatch.
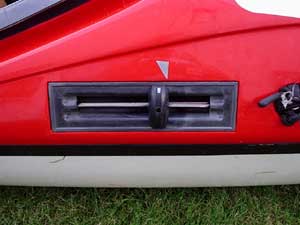
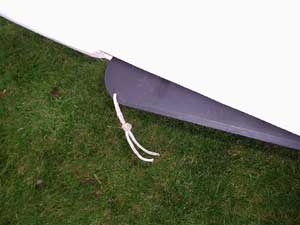
Skegs - love them or hate them, lots of modern boats have them. I found it helpful to have a visual marker on the slider control to show the skeg's position and also added a short length of cord to the skeg itself to make it easier for someone to pull the thing down on the water if the box has collected sand or pebbles after a beach launch.
 |
 |
A bit of tape tells me the skegs position. |
The hole is already there on some P&H boats
- just add cord. |
If your skeg is causing problems, have a look at this article for some ideas on how to fix it.
Tow-lines - I like a deck mounted bag to stow the rope, although the one I use has been modified a little so as to secure the hook under the flap and opens for'ards to make releasing the hook easier. Pulling the hook releases it from under the pull strap, opens the bag and the line streams clear easily. (I put some general thoughts together on tow-lines in a separate article.)
 |
 |
 |
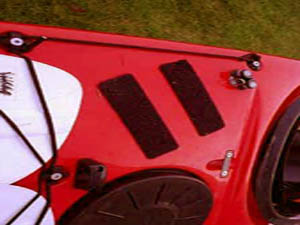
Two strips of self-adhesive Velcro on the deck secure
a modified Knoydart
tow-line bag. Picture also shows the bulls eye and deck cleat. |
This bag has been modified so that the line passes
thro the fairlead into the bag, through an eyelet made in the flap and
then through the cleat. |
The line is then taken over the bag and stuffed
inside. (The line is daisychained to make stowing easier, but the chain
is left open.) |
 |
 |
Once the line is stowed, the hook is
secured under the grab handle - velcro has been sewn to the flap and
the handle to hold it. Grabbing the hook and pulling releases it from
the handle, opens the bag and allows the full length of line to stream
clear. (See also this related
article for the rationale for the modification.) |
|
~ ~ ~
Another way of dealing with tow-line storage is illustrated here, devised by Chris Bolton. The towline is stowed in a bag on the deck, already led through the fairlead and onto the cleat. The fairlead is raised to keep the line clear of the paddles. The block supporting the fairlead is araldited to the deck, to maintain watertightness; it has withstood towing without coming off, but if it did, the towline would still work running directly from the cleat, which is bolted through the deck in the cockpit area.
 |
 |
The tow line bag in place - the line is led through the fairlead (bulls eye fitting) and then back to the cleat before the bag is secure under its bungee. The second pic shows the line deployed, although not all the line is shown. The bag contains 20 mtrs. of line. (Pics: Chris Bolton) |
|
~~~
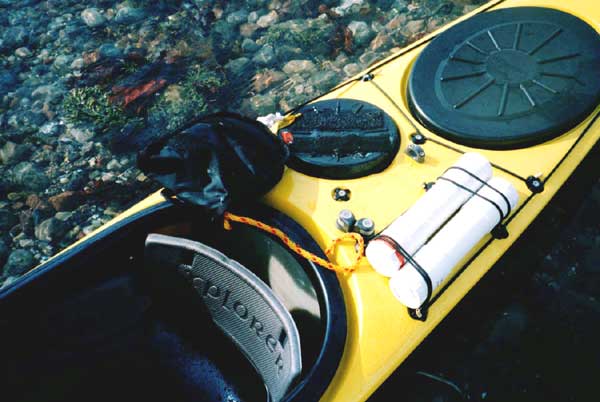
If space on the back deck is a problem, you could do what Robert Craig did and mount the bag on the cover of the day hatch of his Vela - he used Sikaflex to stick velcro to the cover and the bag then sits neatly on the cover.
He doesn't pass the towline through any holes in the bag at all. The bag just sits there (tied on with a separate bit of string) and all the rope falls out when needed.
An even simpler scheme, which he saw recently, is to have no bag, but merely a piece of netting fixed to the deck. The towline is pushed under the net.
 |
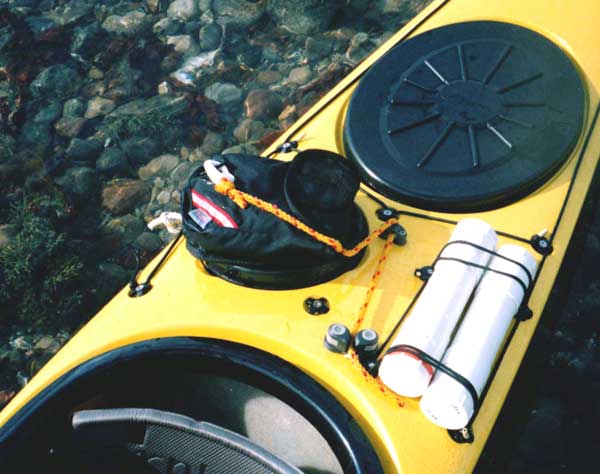 |
Robert Craig's solution to attaching
a Knoydart tow-line
bag to the day hatch cover. The two white containers on the right
of the pictures are waterproof flare containers made from 40mm waste
pipe and a multifit union with a blank at each end. (Carlisle
Canoes sell them ready made). |
|
Go to |
|||
I'd welcome any thoughts, input, ideas
or suggestions either on the concepts here, or on any other ideas you
use yourself or have seen someone else using, so please feel free to
contact me if
you can add to this in any way. |
||
| Mike Buckley - October, 2004. | (Page last updated
26-Jul-2013
) |
|