Outfitting Sea Kayaks - pump installations
Go to |
|||
Ideally, everyone should have some form of pump system, even if it's only a stirrup pump. Modern boats with the rear bulkhead close behind the seat (as with the Quest) will be relatively dry after a bow-lift rescue but many older designs (and even the new plastic Capella) will have a relatively large amount of water left in them as the bulkhead is placed quite far back.
Big seas can make a bow-lift difficult or even impossible to perform, so a scoop rescue may be the only way to deal with the situation. However, after a scoop rescue, the boat will be full of water. Getting it out is essential.
A lot of water enters during a surf launch or even off boots, and a leaky spraydeck will let a considerable amount of water in while paddling.
A foot pump is simple, fool-proof and means you can keep paddling (and balancing or bracing - there is a strong argument in favour of having both hands on the paddle) while pumping out and of course the deck can be in place while all this is done. Electric pumps are perhaps even better, as long as they keep working and the batteries don't die or the wiring and switches corrode in the hostile salt-water environment they are being asked to work in.
Deck mounted pumps are another option, the modern Compac 50 (Henderson / Whale) ones mounted on the fore-deck and operated with a removable handle are as good as foot pumps, but of course you need to put the paddle down to use them. A problem in bouncy conditions? (Manufactures / parts suppliers contacts for these are to be found on the Resources page).
The older style pumps with a fixed handle and mounted just behind the cockpit can be seriously hard to use. Lendal used to produce a simple pump system which constantly pumped with every pushing action against the footrest.
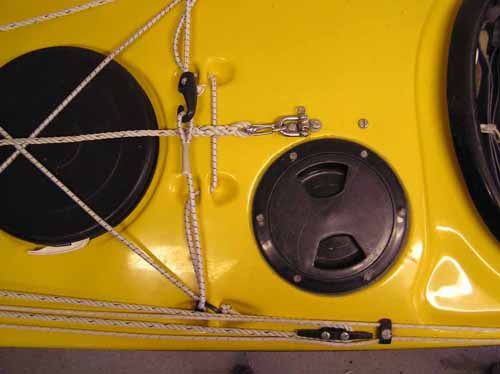
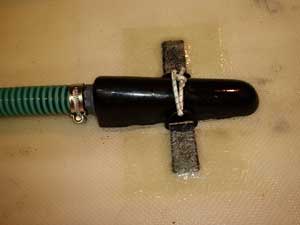
Deck mounted pumps - the early pumps mounted behind the cockpit can be difficult to use as you're applying an upward/downward pushing motion to one side, usually quite wobble inducing! The one below is fitted to an original Nordkapp and these pumps seemed to be very popular a few years ago. Pic also shows a bulls eye towing point on the centre line, with a cam cleat on the port side to allow the tow line to be quick released.
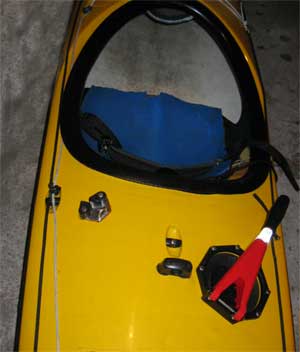
Early "Chimp" type pump. (Pic Ali Grant)
~ ~ ~
Chris Stephens suggests that although it's not something he's done himself, this link shows a method of reconfiguring an older style sea kayak - the type which has a chimp deck pump mounted astern of the cockpit, (like the one above). The deck pump is moved to the front bulkhead for use, with slight adaptations, as a foot pump. The hole where it came from is covered with a dinghy bouyancy tank inspection port, and a new bulkhead is installed immediately aft of the cockpit to create a day hatch space and reduce the volume of the cockpit compartment.
The author, Peter Carter, an Australian paddler, makes some interesting points about pump systems generally and also about cockpit volume. Our antipodean friends seem to favour much smaller volume cockpits and electric pumps are popular with them. Peter's article mentions these and warns of the risk of failure from complex systems. Worth looking at.
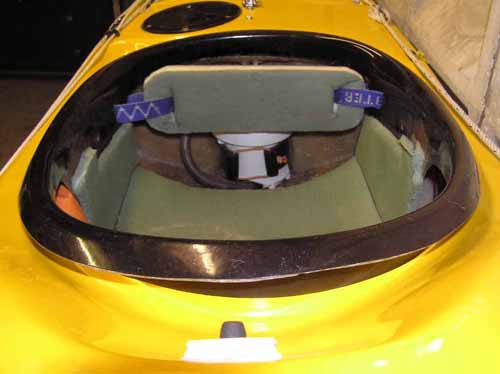
Rod Slaughter's boat has had this modification. (Pic Rod Slaughter)
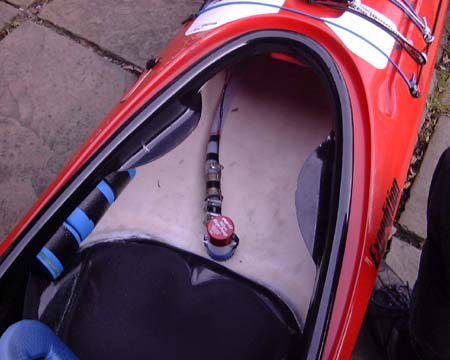
Electric pumps - these broadly break down into two categories, the self-contained Attwood "Waterbuster" type of pump powered by internal batteries and some variation of the theme of adapting a submersible bilge or water pump, usually with a separate battery. Mention has been made on some of the Antipodean sites suggesting the shaft seals on the Attwood have been known to fail, so worth checking these on a regular basis.
Here are some worthwhile existing discussions and links to external sources:
This discussion makes reference to Henderson foot pumps as well as automatic electric bilge pumps and has comments on installation and battery type as well as a very neat "reed switch" idea using a modified skeg slider.
A very detailed discussion looking at electric pump installation - includes note of where to source various electrical parts and mentions "air switches" as a means of controlling the pump.
Damiano Visocnik sent me two .PDF's with a superb description of his installation of a Rule 500 electric pump. It's operated by a magnetic reed switch. A fascinating way to turn the pump on and off, especially as he built the switch himself!
This discussion on the Australian "Sea Kayak Forum.com" has a lot of useful detail on installing an electric pump.
Will Herman's excellent blog has a section describing the electric pump installation fitted in his Rockpool - the installation was done by Mike Webb of Rockpool.
Mikebelluk fitted a Rule 500 to his strip built boat and detailed the installation on his blog.
Peter Baker has fitted a variety of electric pump set-ups - his "Mk5" version is detailed in this Powerpoint presentation, with instructions in this Word doc.
~~~
Douglas Wilcox has fitted various types to his boats.
Here's the bilge pump version -
(Jim Wallis also has a similar setup, as described at length here in a post on the Community Forum. It goes into considerable detail on the materials and technique to make the whole thing work).
 |
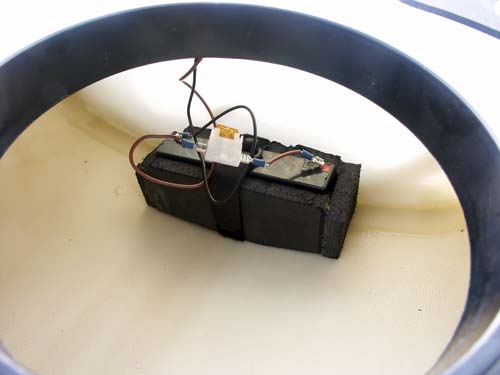 |
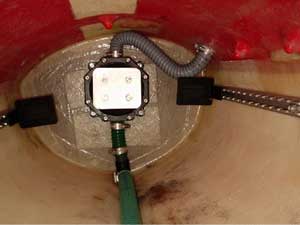
| The pump installation behind the seat and the battery installed in the day hatch. |
|
 |
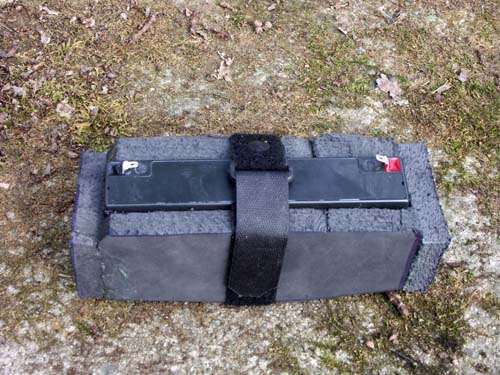 |
| Components of, and the finished battery box. (All Pics Douglas Wilcox) |
|
- - and his installation of an Attwood -
 |
 |
 |
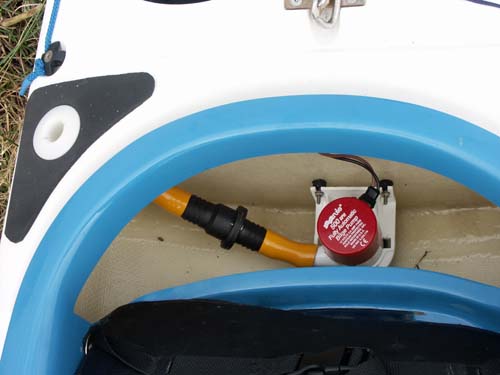
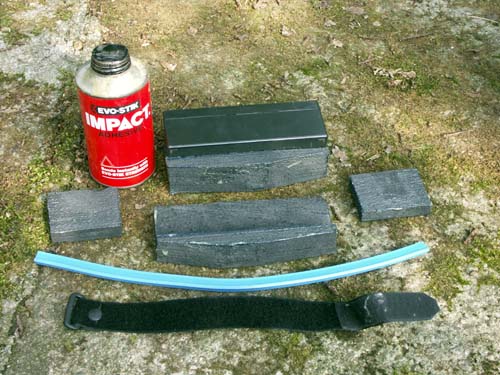
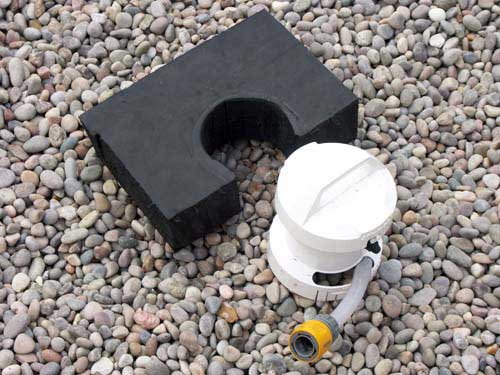
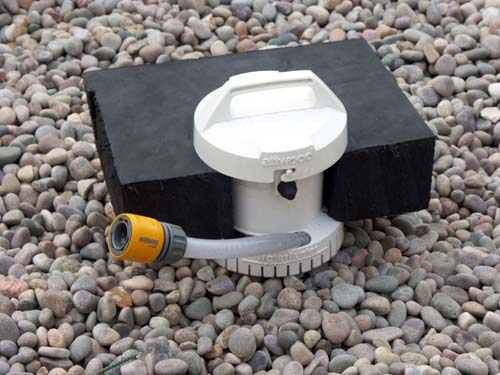
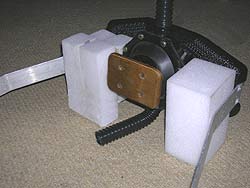
| A block of foam with a
cut-out to take the profile of the Attwood pump is then glued to the
front bulkhead. The heavy metal plate (weight) at the bottom of the
pump has been removed. Douglas says that although he'd experimented
with using a one-way valve in the outlet, it restricts flow too much
so he now plugs the outlet with a cork. This has a cord attached to
it so that it can be pulled out of the outlet while seated in the cockpit.
|
||
~~~
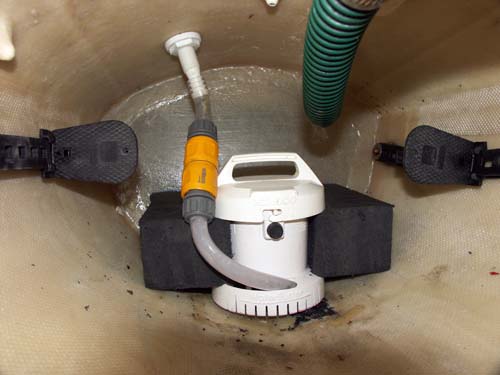
Rod Slaughter also has an Attwood installation, fitted behind the seat.
(Pic: Rod Slaughter)
 |
|
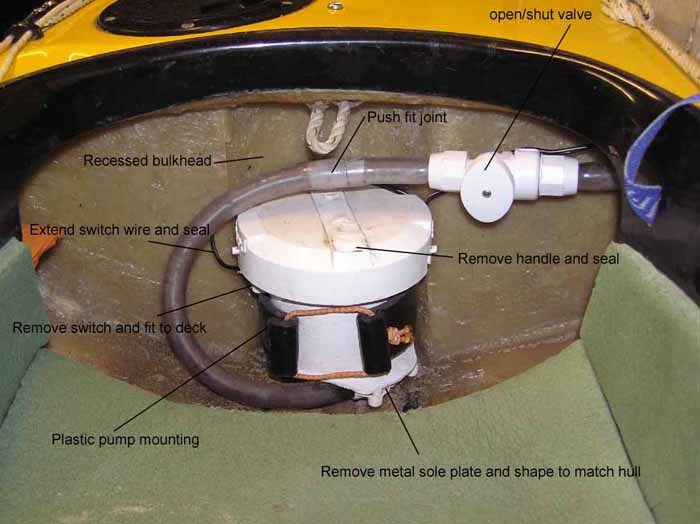
| In Rod's installation,
he removed the original deck pump and fitted a dinghy inspection port
to create a day hatch. A new bulkhead was fitted behind the seat with
a recess to make space to install the Attwood. The switch was removed
from the body of the pump and re-installed at the front of the cockpit.
(Pics: Rod Slaughter) |
|
~~~
Geoff Seddon fitted an electric pump into his Island Expedition - click here for the full description and more pictures.
Geoff Seddon's pump installation (Pic: Geoff Seddon)
Foot pumps - the Whale / Henderson Compac 50 foot pump seems to be the benchmark fitting and can be supplied already fitted from most of the mainstream manufacturers. If you're buying a new boat, you can get the manufacturer to install the for'ard bulkhead in the right place so that the pump is positioned "just so" for effective use. If you have biggish feet, you might want to get them to mount it slightly higher than normal on the bulkhead.
My Quest had to go back to have the pump and pump outlet moved from its original position as the plate was too low for my size 11's and I couldn't use the ball of my foot to push on the plate. Be generous with your inside-leg measurement when ordering the boat as it's much easier to add material to the pump's foot plate if it's positioned too far for'ard. Also specify where you want the outlet otherwise they'll probably put it on top of the hull which is perhaps not the best location unless you like doing "whale impressions" when pumping out.
If you are buying a second-hand boat with a pump already installed, make sure you have enough leg room to use the pump properly. Moving the bulkhead isn't really an option.
Most manufacturers just provide a bit of tube as the inlet, but I think pumps benefit from having a "strum box" at the end of the inlet pipe as it helps remove more of the water. These are best secured in some way to make them work properly and glassing or gluing them in isn't (in my view) the best solution as they'll probably break off the first time you catch the pipe with your feet. Better to use bungee and D rings as it allows it some flexibility and makes it practical to remove it if necessary, while still giving enough flex to allow for the suction pipe getting snagged by your feet.
The further back you can get it, the more water will be removed. The set up shown below leaves the boat virtually dry. This solution works well for P&H boats (or other manufacturers who produce a two-part seat) as it's easy to unbolt the seat pan to work underneath it.
For boats with a one piece seat, check carefully that the strum box will fit properly underneath it with you sitting in the seat before committing to any glassing! Most boats will have enough space to get the pipe under the seat and the strum box could be secured behind the seat - there should be enough space to secure the D rings. Failing that, place the strum box in front of the seat.
 |
 |
 |
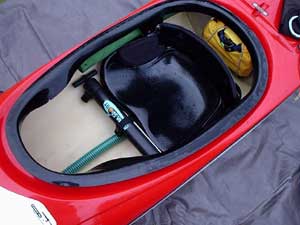
This is the installation in my P&H Quest - the seat has been removed, (easy - two nuts & bolts), D rings glassed in and bungee used to secure the strum box. There is just enough room under the thigh bulge on the front of the seat to do this. The strum box has been profiled to the "V" shape of the hull, and then slightly scalloped to help collect water. Since the picture was taken, the scallops have been made much larger. |
Seat re-installed, the strum box is hidden underneath. A slot has been cut in the foam under the seat flange to allow the pipe to pass under the seat. Pic also shows flare bag, and secondary pump mounted on the seat flange. (See below for details). Green thing at the side of the seat is a small bit of old Karrimat to use as a sit-pad for lunch stops or in camp. |
Henderson footpump in place - a thin aluminium plate gives me a little more leg-room than the standard plywood foot-plate, and this pump has been re-mounted a bit higher up than normal, and the outlet re-positioned more to the side. I wish that had been done at manufacture! Aluminium Yakima tracks are much more solid than the original plastic ones. |
~ ~ ~
Fitting a footpump in a poly boat can be a little more challenging owing to the fixed bulkhead position, a bulkhead which itself may not be as secure as that in a f/glass boat - this article from the Dutch site Zee Uitrusting offers a possible solution. It could of course also be applied to standard production f/glass boats where the bulkhead is already in place and can't easily be moved.
~ ~ ~
Chris Bolton uses one of the early Lendal foot pumps. The concept being that by having a one-way valve in a system where the pump tube also acts as part of the foot brace in the boat, the constant alternating pressure on the tube from your paddling and rotation action will give a constant drain for any water that finds its way into the boat.
 |
This photo is of the "use anywhere" (stirrup) pump on the left, complete with hose, and the installed pump / footrest on the bulkhead - the two pieces of black tube. Chris says this pump is made from two sections of rubber hose from a Lendal pump, with the Lendal one way valves, but oversize discharge hoses. It takes up almost no space and will empty the cockpit in 10 minutes using normal alternate foot pressure while paddling. (Chris thinks the parts for this are no longer available from Lendal.) (Pic: Chris Bolton) |
Stirrup pumps - I carry a stirrup pump as a back-up, and to help others - there is a strong argument in favour of having them accessible on the deck, but I personally prefer to have it in the cockpit. Originally I stowed the pump down the side of the seat (where the sit-pad now lives) but couldn't get to it when it was needed in a hurry. The disadvantage is that I would of course have to pop the spray deck to get to it, a potential problem in big seas so if it's your only pump system, this solution may not be ideal.
That said, if you carry it primarily for your own use, if you do need it, you'll have been out of the boat anyway so it may not be an issue to store it internally.
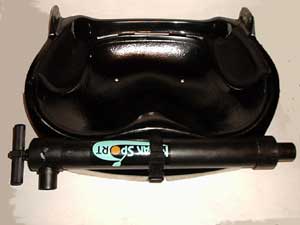
I remounted it on the flange which forms part of the seat design in my Quest. The KayakSport pump is a substantial piece of kit, with a steel shaft for the handle and this feels much more robust than the plastic shafts commonly available. I have discovered it doesn't float though, and is easily lost in the dark, so the replacement one has some high-density foam round it, and reflective tape.
 |
 |
|
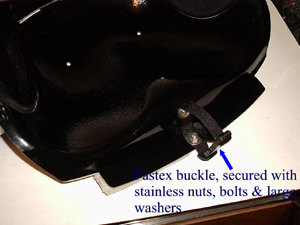
First job was to remove the seat, trim a little
off each end of the flange (to allow the pump to sit lower) and attach
a bit of an old belt with a Fastex buckle using some stainless hardware
and large washers. |
Here's the pump mounted on the seat - this pump just fits across the hull - check carefully first! It sits just below thigh height and is unobtrusive when seated in the boat. The seat has two holes drilled to allow water to drain into the hull. |
The finished job - a quick deck-pop, release the buckle and
the pump is instantly to hand. Sit-pad on starboard side - there's a
rolled up survival-bag on the port side. |
Go to |
|||
I'd welcome any thoughts, input, ideas or suggestions either on the concepts here, or on any other ideas you use yourself or have seen someone else using, so please feel free to contact me if you can add to this in any way.
|
||
| Mike Buckley - October, 2004. | (Page last updated
12-Apr-2012
) |
|