Repairing a Skeg
Mike Buckley - May 2009
|
|
|
Love 'em, or hate 'em, the majority of modern sea kayaks
are designed to incorporate a skeg. Many are operated by a slider system
controlling a wire to raise and lower the skeg and it's common for the
wire to kink, become clogged with sand or grit or even (sometimes) to
break. Other systems are operated by a cord or thin rope, and one of
the latest innovations on the market (from KariTek) operates the skeg
by hydraulic fluid.
As a matter of course, if you have a brand new boat with
a wire controlled skeg I'd strongly recommend pulling the cable and
lubing it with furniture polish. This simple act will help ensure a
much smoother action, even from new. Don't ask me why it's not done
at time of manufacture!
The two most common causes of skegs failing are easy to
prevent. Retract the skeg before landing or if there's a risk of it
grounding on something, and if it does become stuck (usually this happens
coming off a beach if sand or pebbles get stuck in the skeg box) and
won't lower easily, do not force it down with the slider - have
someone pull it down at the skeg itself. This will usually also clear
the obstruction. See later for more thoughts on that. This discussion
has some thoughts on preventing stones getting into the box.
This article details how to repair a wire operated skeg
where the skeg wire has been damaged, but the general principles of
how to remove the skeg will also apply if it's necessary to remove the
skeg and wire for maintenance.
The "patient" is an early P&H Capella, but
the principles apply to virtually all boats - where it's known that
another manufacturer uses a different system, or the procedure differs
from that shown, then that is noted.
For other manufaturers boats and variations on the theme,
notably rope operated skegs, specific known problems and thoughts on
making your own skeg system, click here to go to
the end of the article where there are some links and notes.
It's an easy job to do. Here's a brief summary of how
to remove and replace a skeg and it's wire - it might just be all you
need to know!
1: Loosen the tiny grub screw in the slider using an
appropriate allen key. 2.5 mm will probably be the one you need. Do
not remove grub screw or you will lose it in the gravel and never find
it again.
2: Grasp skeg with the appropriate hand for your natural
dexterity.
3: Pull skeg out of the skeg box - and keep pulling.
You will now see that the skeg pivots on a slot.
4: Remove skeg - for the non-mechanically minded this
involves slipping the skeg away from it's pivot bar using the slot.
5: Pull all the wire out. Flush the conduit with water
from a hose pipe to remove any sand - wipe off the wire - lube it with
furniture polish (NOT with oil or grease of any form!).
6: Reverse the above to fit the skeg. Remember to tighten
the grub screw! Job done.
Wilderness Systems offer this video
on cable replacement, which may also be of help.
If you need more detail, or you need to replace a damaged wire, read
on:
P&H skeg wires are bonded into the skeg itself, so
replacing a damaged wire usually requires the purchase of the entire
assembly at a cost of about £35! This article shows you how to
replace just the wire. Valley (and some others) secure the wire to the
skeg with a grub screw, which makes the process easier. You could consider
Toby Speight's cunning modification to make the wire "field
replaceable" in the future using the readily-available electricians'
terminal blocks, epoxy resin adhesive, and hot-melt glue.
Wire can be sourced from a number of places - I used 3
mm 1 x 19 "Denwire" from LDC
Racing Sailboats following a recommendation on the forum. In my
view, you're looking for a stiff rather than a flexible wire, so I felt
that the alternative 7 x 19 (19 strands, each made from smaller wires
of 7 strands) would be too flexible and therefore kink too easily. 7
x 19 also strikes me as having rather a lot of "unravel potential".
The
Wire Rope Shop has also been mentioned as a source.
Note though that this suggestion may not be best for Island
Kayaks boats, which use a continuous loop system, so the more flexible
7 x 19 wire may be a better choice.
There's more to wire
construction than you'd imagine. Most chandlers will have suitable
stainless steel rigging wire but the wire which is often available in
ironmongers and DIY stores seems to be too flexible.
This sort of wire is incredibly difficult to cut so I'd
suggest being very specific with the exact length needed. I ordered
2.3 meters on their on-line ordering system - they sent me 2.6, which
was too long to fit into the wire conduit on this Capella as the end
is closed off in the cockpit. Some boats will have an open conduit end,
or the cap can be removed.
Not having a proper wire cutter suitable for such heavy
wire I resorted to holding the wire in a vice and used a cutting disc
on an angle grinder. Which did the job nicely. Make sure the direction
of the disc's rotation is appropriate to the lay of the wire, otherwise
it will open up. Everyone should have one, but not everyone does of
course, so I recommend getting the right length in the first place.
I tried ordinary wire cutters, a cold chisel, a hacksaw and a brick
bolster to cut the wire - none of which worked! A Dremel with a suitable
cutting disc is also reported to have worked. Please take all the usual
safety precautions as I accept no liability if this goes horribly wrong!
Michael Wilkinson mailed me in November 2014 to comment
that the method he used for cutting the cable to length was to drill
a hole with the same diameter as the cable through a small block of
wood. He then fed the cable through the block. This was then held in
a vice and he used a hacksaw to cut through the wood and the cable.
As the cable was completely enclosed without room to move, he says he
achieved a perfect, straight cut without the slightest fraying of the
cable. Again, probably worth making sure the lay of the wire and the
cutting direction of the blade are suitably aligned. It does seem like
a neat, safe method.
Another way would be to use a proper Bowden
Cable cutter - alternatively, your local cycle shop will probably
be able to cut the wire as they'll certainly have one. Some boats have
an open conduit end in the cockpit, so cutting the wire may not be necessary.
Note that it seems that replacement P&H skegs with the wire already
bonded in are provided with a wire some 250 cms in lenght.
Tools & materials needed:
Allen key - also known as a hex key - to loosen the grub screw on the
slider. It'll probably be 2.5 mms, or suitable small cross-head screwdriver
- probably Phillips No 1, as appropriate.
Drill with 3.5 mm bit to clear the wire hole in the skeg and remove
the original bond if the wire is bonded to the skeg.
Round file.
Acetone to clean off the surfaces.
Araldite to re-bond the wire.
Electrical tape to blank and finish the bonding.
Furniture polish to lube the wire.
A vice is helpful, but not essential.
Total cost, including postage, was just over £5.00
for the wire. The new slider is under £3.00 direct from P&H
who gave excellent service and advice.
|
|
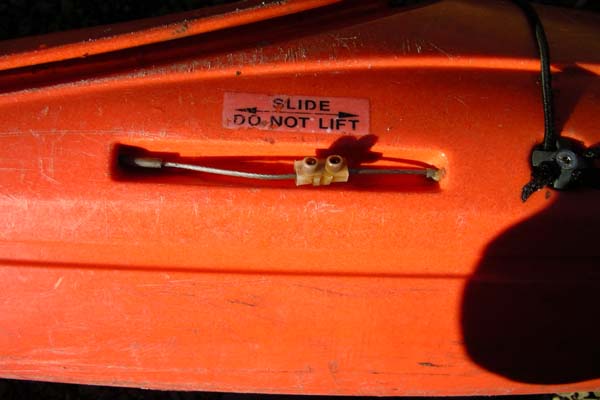
This particular boat has clearly been "repaired"
previously - the original slider has been replaced with an electrical
connector - - -
The standard slider is secured to the wire with a small grub
screw - a 2.5 mm hex key is needed. Sometimes however, a small
cross-head screw is used instead - usually because the previous
owner has lost the grub screw.
P&H tell me they can no longer supply the original, round
slider for the early Capella so an alternative will be used
in this repair.
As can be seen, the wire has kinked badly - it was sticking
in the conduit, and may have been forced, bending it. Another
common cause of the wire being bent is people lifting the wire
rather than sliding the control. P&H's early solution was
a sticker telling you what to do!
|
For comparison, this picture shows the slightly later system
used on a 2002 P&H Quest - and many other boats. The slider
itself runs on an integral steel bar which prevents it from
being lifted - it's still possible for the wire to be kinked
though.
(Valley use a broadly similar system, and there is a known
problem with a small number of sliders where the incorrect materials
were used and the system rusts badly. This
thread on the forum is worth looking at for details of how
to deal with the problem, and has links to some pictures of
the Valley skeg slider control.)
The slider is secured to the wire with a small grub screw -
generally, a 2.5 mm hex key is needed.
I now carry one in my repair kit, just in case I need to do
a field repair.
|
Stage 1
Loosen the grub screw (or cross-head screw)
in the slider just enough that it can run easily on the wire
- DO NOT remove the screw entirely as you'll almost certainly
lose it and that will ruin your day!
Now turn the boat over so you can get hold of
the skeg blade.
|
|
|
| 1: Gently start to
pull the skeg - if the grub screw on the slider control has been
sufficiently loosened the wire will pull through it (if it isn't
the sort retained on an integral bar, catch it and put it somewhere
safe) and the skeg will lift out of the skeg box. |
| |
|
| 2: Continue lifting
and you'll be able to slide the skeg blade clear of the pivot
pin. |
|
3: Remove the skeg completely and withdraw the wire from it's
housing. This particular one has clearly been troublesome and
someone has used oil to try and lube it. The anti-rattle strips
have also been damaged.
Oil, WD40 or other spray lube products or grease really isn't
recommended as they will only attract grit - it's better to
use some form of silicon on the wire - furniture polish is ideal.
If all you're doing is cleaning the wire, then use a hose to
flush the conduit, clean the wire, apply some furniture polish
and re-assemble.
|
Stage 2
Now it's off to the workshop - -
|
|
1: P&H and others bond the wire to the skeg blade - (Valley,
and some others, use a grub screw). To remove a bonded wire,
secure it to something and pull the skeg. If you're lucky, it'll
just pull out. If it doesn't, then various methods have been
suggested - one is to heat the wire with a blowtorch and that
will cause the bonding to melt, freeing the wire. Another suggestion
involves placing the entire skeg blade in boiling water to heat
it, remove, and then pull it off the wire.
I drilled either side of the wire to destroy the bond, secured
the wire in a vice and pulled it out - only moderate force was
needed but this could have been just because I was repairing
a previous repair and not dealing with the original bond. I
then cleared the cross drilling with a larger drill bit and
a coarse file and finished with a finer one and chamfered the
edges a little with a counter-sink tool just to tidy it up.
|
| |
|
|
2: Clear the wire entry hole (I used a 3.5 mm
drill bit to make it slightly oversize - the wire is 3 mm on this
boat) - I drilled on into the skeg as well to help the wire locate.
I cleaned the skeg up with acetone to remove the
oil residue and any other contaminants.
It looks as though heat was used to remove the
wire when it was repaired previously.
|
3: I also replaced the damaged anti-rattle strips using the
"fuzzy" side of self-adhesive velcro and drilled a
hole to attach a length of paracord.
This makes it much easier for a buddy to pull the skeg down
when the boat is afloat if the skeg has jammed with gravel or
sand, and is much easier than fiddling around trying to grip
it with pliers and you'll certainly not get a grip on it just
using your fingers.
Mark the hull somehow to show where the cord is - it really
makes it much easier to find when at sea.
Trying to force the skeg down with the slider is a common cause
of the wire becoming kinked. If the skeg has jammed, pull it
down instead of forcing it with the slider - wire doesn't like
being subjected to compression forces.
If you leave the wire skeg down when you run up on land or
over an object, the wire can kink. So learn not to do that!
If it's a club boat, this is an essential learning point for
your members.
|
|
|
4: Mix some epoxy resin - I used Alaldite.
One side of the hole has been blanked off with electrical tape
to retain the epoxy and create a nice smooth finish.
(At this point, you could consider Toby Speight's cunning modification
to make the wire "field
replaceable" in the future rather than bonding the
new wire into the skeg.)
|
5: I also cleaned the wire off with acetone (nail varnish remover
will do - or any similar solvent) to remove any oil or grease,
and smeared some epoxy on the wire end before gently inserting
it into the hole and on into the body of the skeg. One strand
unraveled a bit which will probably be a good thing as it gives
something for the epoxy to grip.
On reflection, splaying the wire a little once it's been inserted
would be a good idea, again just to provide more grip.
|
|
|
6: I then filled the hole with epoxy, working it well around
the wire with a toothpick - another piece of tape went on top
and I ran a straight edge over it just to squeeze the resin
into the wire as much as possible, but also to give a nice smooth
finish on both sides.
I also dressed the other end of the wire with a smear of epoxy
to stop it unraveling when being fed into the conduit
Leave it to set overnight.
|
7: The end result 24 hours later! Quite pleased with it overall.
If you dressed the control end of the wire with epoxy, now's
the time to check if it needs a rub down with sandpaper to make
sure the diameter is the same as the rest of the wire or it
won't feed into the conduit and the slider control.
|
|
Stage 3 |
|
|
1: Furniture polish applied over the length of the wire.
Any silicon type lube will do - but don't use oil or grease
or spray lubes like WD40.
|
2: As the original round sliders are no longer available, P&H
suggested the later "T" shaped slider with the end
cut off at the point where the supporting bar would normally
go. A hacksaw and sandpaper created a reasonable fit for the
slider in it's recess on the boat.
P&H supply the slider with the correct hex key - which
is nice.
The hole was slightly too small for the wire, so I opened it
up a little using the 3.5 mm drill.
|
|
|
3: Re-assembly really is as simple as just reversing the removal
process shown earlier - take care to prevent the wire from unraveling
as you feed it into the conduit at the skeg box if you've not
dressed it with epoxy when you were working on it earlier.
Once the wire emerges from the conduit in the slider recess,
feed it through the slider and on into the conduit at the other
side. Adjust the slider so that the skeg is able to drop enough
and then tighten the grub screw.
This particular repair has worked very well, although as the
second picture shows, the wire tends to sit a little high when
the slider is run back to drop the skeg so a little care will
need to be taken not to lift it! Then again, that's what the
sticker says! The Denwire seems to be less flexible than the
original, so may be less inclined to kink anyway.
As a final tip, it's worth checking the wire conduit in the
boat to make sure it's well secured along it's length - if it
can flex away from the hull that can be a cause of a "sticky"
skeg. I've used Araldite and also Sikaflex to secure conduits
to the boat's structure.
|
Other useful resources.
These external links and discussions from the Forum might also
be helpful:
Variations & Known Problems.
| P&H Capella |
|
| |
|
Tom Fuller notes that some later Capellas (this
one is a 2004, 3 hatch version) use a different slider arrangement
where the wire runs thro a guide tube, the slider knob being
secured thro a hole in the tube. The wire is moulded into the
skeg. The slider uses a crosshead screw. Click
here for a .pdf with his description and pictures.
There is also a known problem with getting the
wire to pass through into the guide tube, and John Norris documents
the solution - click here
for a .pdf of his description and pictures (also linked from
Tom's article).
|
| P&H Cetus / Scorpio / Delphin |
The P&H Cetus, Scorpio and Delphins
have a known problem with some of the early boats - the skeg is
controlled with a cord and bungee system and has a new design
of slider with a ratchet system, and can be very stiff to operate.
Douglas Wilcox has produced a very detailed overview of the problem
together with some suggestions which may help fix it - click
here to go to the relevant post on his blog. See also this
discussion
and this one.
This discussion
on the problem as specific to the Scorpio may - or may not - help.
Even the Mk II version as fitted to later boats is known to be
problemantic. This may be down to a badly fitted axle and this
discussion
has pictures and thoughts on how to adjust it.
This blog has a superb write-up and pictures on how to completely
replace the original P&H system on a Cetus with the excellent
Kayaksport version. |
| Island Kayaks |
The Island Kayaks range use an off-set
skeg arrangement, with the wire being attached to the skeg using
a grub screw - click here
for a .pdf with details of the slider and skeg attachment. Thanks
to "jamesl2play" for the pictures.
Jim Tait had a problem with a skeg which kept dropping, despite
the slider being adjusted correctly - this discussion
details the problem and the fix.
See also this discussion
on replacing the entire wire on the "continuous wire loop"
system. Note that in this particular application, the use of the
more flexible 7 x 19 wire may be better than the 1 x 19 recommended
for other applications, and it seems to use thinner wire at 2.5mm. |
| Rockpool |
| There is a known problem with the
skeg on some Rockpool boats being very tight - there are two possible
causes.
1: The bolts securing the skeg pivot tighten up. Loosen them.
2: "Goeffm" comments that he found that the nylon insert
in the skeg was a very tight fit in the skeg itself. The skeg
is supposed to pivot on this insert, which simply acts as a spacer
for the pivotting bolt to tighten up on (and thus loosening the
bolt to improve a tight skeg really doesn't fix the problem).
He suspects that the nylon absorbs water after a short period
of time, expands and binds up so he did a little work with a Dremel
and gave the insert a smidgeon of clearance. After putting it
all back together he has a lovely smooth functioning skeg.
|
| Tiderace |
kayakacademy.com have a detailed outline
on how
to remove and replace the cable on Tiderace boats.
Tiderace seem to use the superb Kajaksport slider control, some
details and pictures of which are in this excellent blog post
on how to retrofit
one to a P&H boat. This discussion
contains links to full instructions on the Kajaksport skeg system,
including how the slider is assembled. |
| Valley Kayaks |
| kayakacademy.com have a detailed
outline on how to remove and replace the cable on pre
2011 and post
2011 Valley boats.
Some Valley boats suffer from rust appearing on the slider bar
- Valley are aware of the problem and can provide replacement
parts. See this discussion
- includes links to several helpful pics.
"Heyaz" provides the solution he used to deal with
a skeg control which had rusted solid - "the previous
owner had allowed the slider to seize solid and I came up with
a pretty neat solution....
I reamed the grub screw out of the nylon slider knob and
carried on down - carefully!! - until the skeg wire was released.
Having slid the wire back out of the guide tube it was a
fairly simple job to carry on reaming away until the slider knob
was moving once again.
I then removed the knob from the guide tube (the tube slides
forwards in the skeg slider box leaving sufficient clearance to
remove the knob). Once removed it was simple enough to drill out
the knob to an appropriate size and press a 5mm stainless nut
deep into the cavity so formed. This can be secured with Araldite
(lubed a bolt and left it threaded through the nut until the epoxy
set then wound it out.) Just needed to cut a 5mm allen headed
cap screw to the right length to replace the grub screw for securing
the slider to the new cable; the cap head sits just flush with
the slider so is not going to chew my hand whilst paddling.
All a bit of a waste of time as Valley are sending me a new
slider & grub screw as we speak, but may be of interest /
use to others!"
|
| Wilderness Systems |
See this video
on YouTube for full details on removing and repairing the
skeg cable on these boats.
To remove the slack in the cable on a Rogue, see
this video. |
Fixing rope operated skegs
For some ideas and techniques for fettling rope operated
skegs, have a look at this
article on Sean T. Noonan's site.
Making the wire "field replaceable"
Toby Speight's very clever and easy modification
to make the wire easy to repair / replace in the field, using only hand
tools.
Making a skeg system
Superb illustrated article by "gnarlydog" on making
and fitting a skeg using carbon fiber to create the skeg box and
polycarbonate sheet for the skeg blade.
Andy Waddington built a wooden
skeg system and his article is worth a look.
Suppliers of materials / parts
LDC
Racing Sailboats supplied the "Denwire" mentioned in this
article.
The Wire Rope Shop has also been mentioned.
All the various kayak manufacturers can also supply wire and/or complete
systems - site links in the Retailers
& Manufacturers section.
Kayaksnorthwest may be able to supply slider controls, but don't
have the very early, round ones.
Kari-Tek produce a fantastic retro-fitable
skeg system. They also sell wire.
Wire lengths needed
Island Kayaks - Expedition : 159.5 cms - but
see the note above regarding "continuous wire loop" system.
P&H Capella (Mk I - square hatch version) : 230 cms - 3 mm.
P&H Capella (2004 - 3 hatch version) : 220 cms - 3 mm.
Point65N XP18 Classic: 198 cm
Valley plastic Aquanaut HV : 220 cm.
Valley Aquanaut : 215 cm.
Valley Anas Acuta - old style - 1998 with skeg control forward of the
cockpit : 200 cm.
Valley RM Nordkapp - 208cm - you can push a bit extra inside the skeg
and beyond the slider, so probably 207cm for perfection.
Wilderness Systems - 229cm - according to the video linked above.
(These measurements are as provided by forum contributors,
but can't be guaranteed as 100% accurate)
See comments earlier in the article on cutting the wire
if necessary.
© Mike Buckley - article originally written
May 2009 - last updated
23-Feb-2016
.
Can you add to this article in any way? In particular,
I'd like to expand the table of wire lengths for specific boats - if
you're working on a boat please measure the wire needed and mail
me.
Also, if the boat you are working on has any specific
details worth recording here, please let me know. It's also helpful
to hear of any "tricks or tips" which have worked for you
and I'll consider adding them to the article. Thanks.
|